My goal was to have a guide system that wouldn’t
“dig in” during a derail with the obvious
consequences. It doesn’t happen often, but when I do
come off of the tracks I’m able to maintain directional
control and so far (knock on wood) haven’t been
dumped. An added plus is that my top speed in now
around 15 –16 miles an hour before it starts feeling
loose and I believe that with a few adjustments, I can
raise that.
The down side is that the convex flange, angled
into the rail, creates a shearing action that makes it
rather noisy. I had hoped that the rubber tire, pulled
into the flange when it was bolted together, would
dampen any noise, but that’s not the case. The next attempt to quiet it down will be to coat the concave side of the disk with a plastic/rubber substance to try to dampen it more. I believe that spray-on pickup bed liner should do the trick. We’ll see.
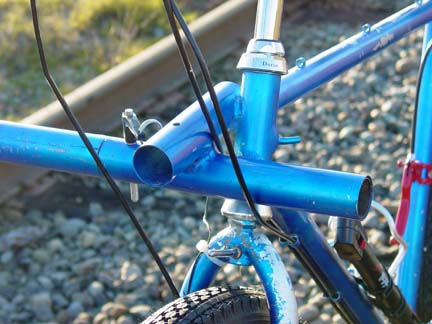
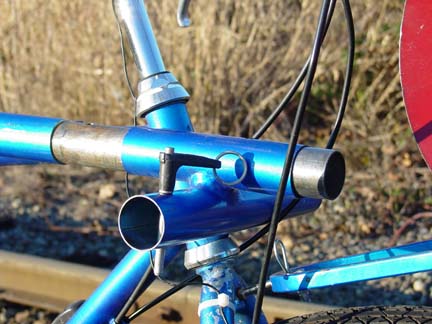
The outrigger design is a radical departure from the usual three arm system. Here I wanted to simplify the design and lighten it up. This high, single tube design works so well at clearing weeds and brush, I’ve named it the Homestake Outrigger. Anyone that has ridden over Homestake Pass will understand. The weeds and brush are high enough between the rails to bring a low outrigger to a complete stop. To attach the outrigger to the bicycle frame, a couple of pieces of the 1 ½ inch tube are brazed to the head tube of the bike. A sleeve of slightly smaller diameter tube is brazed into the end of the outrigger and telescopes into the sideways tube to ride on the tracks and into the lengthwise tube to ride on the road. No added weights and no tilting mechanism. So far, I haven’t really found a real need for either one. Body weight to the inside on a left hand curve seems to work and a normal riding position is fine for all other situations. The skateboard wheels on the outrigger are attached to the main tube with a sleeve and pin also so it could be removed and a weight shoved up in the tube if necessary.
My present outrigger tube was bent for me by a muffler shop and has their characteristic looking bend. I hope to have a new tube bent up with a bit smoother radius. Purely for looks, it would add nothing to the design.
The last unusual feature of the bike is the gearing. Instead of the usual derailler, I opted for a seven speed internally geared hub called the Nexus System by Schimano. Again a suggestion by Dick Smart. It is a common system in Europe but sometimes difficult to find here in the states. The advantage is not having anything hanging down to catch in the usual debris around abandoned tracks.
One of the aspects I love about this sport is the designing and building. It gives a real sense of accomplishment to design, build and then ride, but I don’t want to stop with this configuration. There is always room for improvement in any design and each one should be considered just a step in the evolution of railbikes. One of the next improvements I want to make is in the way the outrigger tube is attached to the head tube of the bike. A piece of u shaped metal with a pin on each end should allow one pin to be removed and the outrigger swung to the back position.
The Homestake Bike Design
The"Homestake" Bike Design
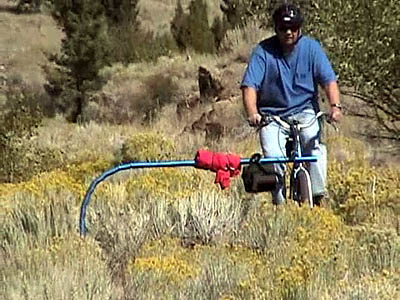
John Vander Ven's extremely simple, one piece outrigger design provides maximum clearance, stability and quick conversion for riding on the roadway.
The"Homestake" Bike Design
John's new outrigger was so successful that I asked him to write an article describing his design. He named it the after
it proved so successful
on Homestake Pass
allowing him to continue riding when all others had been stopped by the high brush.
Peter has asked me to write a little about the design of my railbike since it is a bit different in appearance. The look is that of three wheels on top of the rail and not much to keep it there, but looks are deceiving. Functionally, it is the same as Dick Smart’s Railcycle design. Truth be known, I looked at Dick’s design a lot for inspiration and the rest is an outgrowth of that. The front guide wheel is angled slightly to pull the flange into the side of the rail and these two opposing forces keep the front wheel of the bicycle on top of the rail and headed in the right direction. The rear wheel of the bike is carefully aligned to follow along.
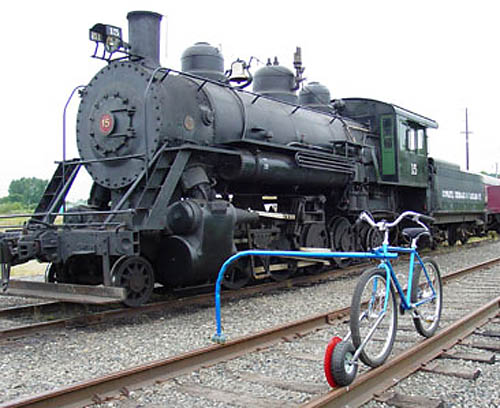
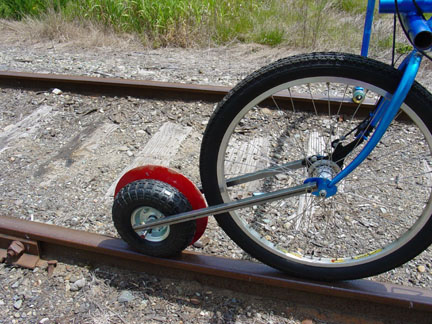
The guide wheel tire is actually a 10 inch hand truck tire, available from Harbor Freight and other places, with the original bearings replaced with higher quality ones. The flange is simply a concave plow disk from John Deere, that has been turned down to a 12 ½ inch diameter. Holes were bored in the disk to match the wheel’s bearing housing and the four bolts of the wheel. The two were then bolted together as an assembly.
The Homestake Bike Design
by John Vander Ven

Looking at the bike from the right side with the outrigger inserted pointing toward the rear in the
road riding position.
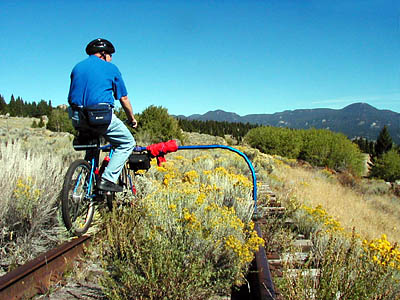
Looking at the bike from the left front with the outrigger inserted in the railbike position.
Bike shown with outrigger swung to the back for
riding on the road.
Editor's Note
Modern technology changes daily - what was hot yesterday is obsolete today. I talked John into helping me build a new outrigger and went to Seattle at the end of March. Before I arrived John had completely repainted his bike (the original pictured above) and had the front wheel flange sprayed with a bed-liner
material to deaden the sound. We built a new outrigger for my bike using a much improved hinged design that allows the outrigger to swing to the rear for road riding without having to be removed from the head bracket. John is building a similar unit for another of his bikes.
Next month we will have an article on my bike and the new design. In the meantime, many of you have asked for more design articles. It's true, building the bikes is almost as much fun as riding them. PLEASE, send us a description of your bike design and some photos. We can't have more stories unless you share with us.
John and I are planning to get back to Homestake Pass and ride from the summit all the way down on both the east and west sides later this year. Check out the photos of the high brush at the top of this story and if you think you can negotiate it, we would love to have you join us.